Prerequisites
Ensure you have the following:- Administrator or editor privileges to fabric Product Catalog. For more information, see Role-Based Access Control.
- A valid Authorization Token to provide in the header.
Workflow Diagram
The following diagram illustrates the required steps to set up Product Catalog.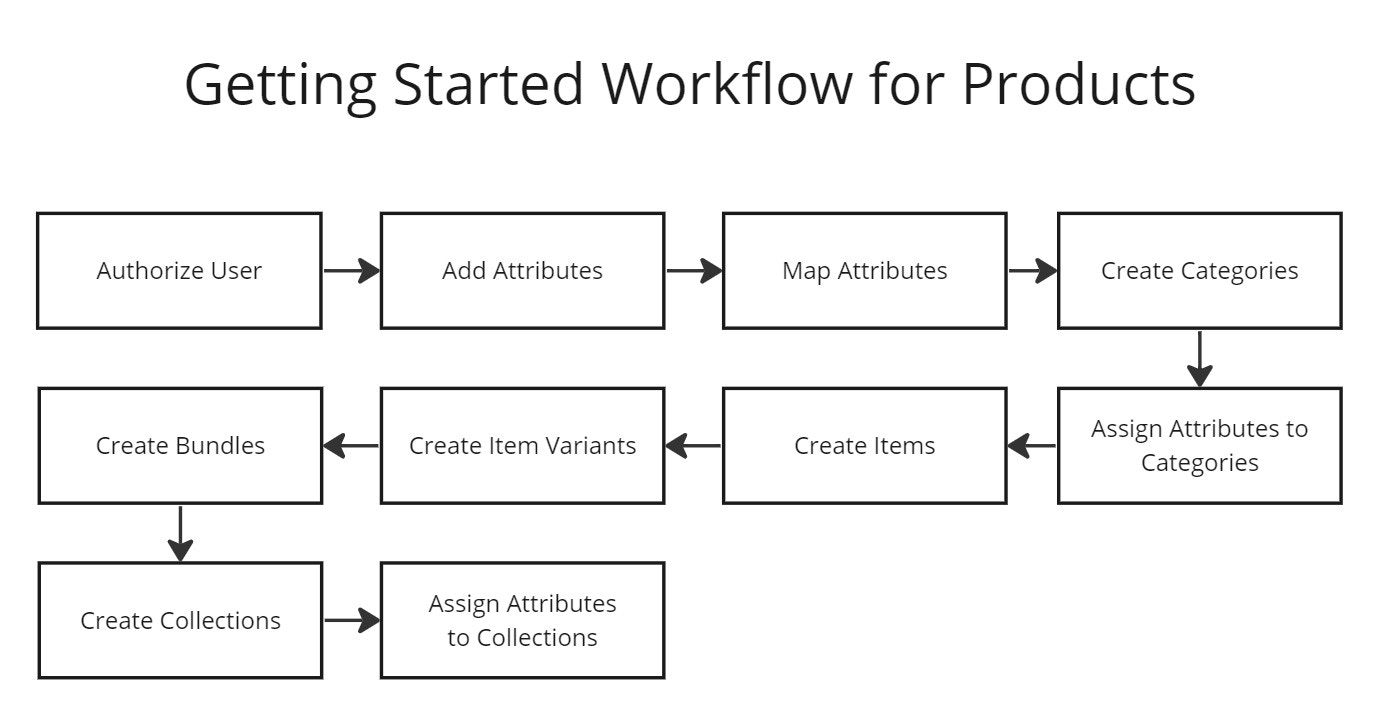
Procedure
Use this procedure to configure Product Catalog. The API collections for the endpoints are:- Before using Product Catalog APIs, users must authenticate API requests with a valid authorization token. Authentication is performed through API apps, which generate API keys to validate requests. Use system apps for backend integrations and user apps for authentication tied to individual or user credentials.
-
Create attributes using one of the following methods:
- Individually: Create a new attribute using the create attribute endpoint. By specifying the
targetin the request body as aproductorcategory, you can assign the attribute to a product or a category, respectively. - Bulk Import: Import multiple attributes at once through bulk import APIs. For more information, see the bulk import guide.
- (Optional) Create attribute groups using the create attribute groups endpoint to group related attributes for easier management and assignment.
- Individually: Create a new attribute using the create attribute endpoint. By specifying the
-
Map the mandatory fabric attributes, such as
sku,title,image, andactive, to the corresponding attribute names provided by the merchant. Use the update attribute mapping endpoint to create or update these mappings. -
Create categories to organize products into a structured hierarchy using one of the following methods:
- Individually: Use the create category endpoint to add a single category. A default root category is created automatically and can’t be modified.
- Batch create: Use the create multiple categories endpoint to add up to 25 categories in one request.
- Bulk Import: For larger imports, use the bulk import APIs as directed in the bulk import guide. Use the
categoryIdsIncludedandcategoryIdsExcludedfields to control which categories are included or excluded in a catalog.
- Assign attributes to categories using the create category or partially update category endpoints. When attributes are assigned to a category, they automatically apply to all products within that category.
-
Add items to your catalog using one of the following methods:
- Individually: Use the add product endpoint and specify the
typeas item. - Batch create: Add up to 25 items at once using the add products endpoint.
- Bulk Import: Import a large number of items with bulk import APIs. For details, see the bulk import guide.
- Individually: Use the add product endpoint and specify the
-
Add variants to existing items using one of the following methods:
- Individually: Use the add product endpoint and set the
typetovariant. - Multiple variants: Add up to 25 variants using the same add Products endpoint.
- Bulk Import: Use bulk import APIs to import variants in large volumes. For details, see the bulk import guide.
If the parent product is inDRAFTstatus, variants are treated as separate items until the parent is published. Parent and child products must share the same category and channel. - Individually: Use the add product endpoint and set the
-
Add bundles using one of the following methods:
- Individually: Use the add Product endpoint with the
typeset tobundle. - Multiple bundles: Add up to 25 bundles using the add Products endpoint.
- Bulk Import: Use bulk import APIs to add bundles at scale. For details, see the bulk import guide.
- Individually: Use the add Product endpoint with the
- (Optional) Use the create collections endpoint to organize products for specific storefront displays. Collections allow you to group products across categories based on shared attributes or promotional needs—ideal for seasonal campaigns, featured product sets, or curated shopping experiences.
- Assign attributes to collections. After creating a collection, assign relevant attributes that will be used to filter the products displayed within it. This ensures that collection rules, such as “color” is “red” or “price” is under “$100,” can be evaluated correctly. Use the get attributes groups of a category endpoint to view attribute groups and confirm the correct attributes are available for use in filtering logic.
Bulk Importing Product Data
The Product Catalog API supports bulk import for attributes, categories, collections, items, variants, and bundles. This allows developers to efficiently manage large datasets and speed up catalog setup. The process involves downloading a CSV template, populating it with product data, uploading it to fabric’s storage system, and triggering a background job to process the file. For best practices and formatting guidance, see the [data ingestion] (/v3/product-catalog/data-ingestion) guide. When bulk importing attributes, be sure to specify the correct attribute type and subtype in the import template. For the full list of supported types and how they’re used, see Product Attributes. The following diagram illustrates the import process.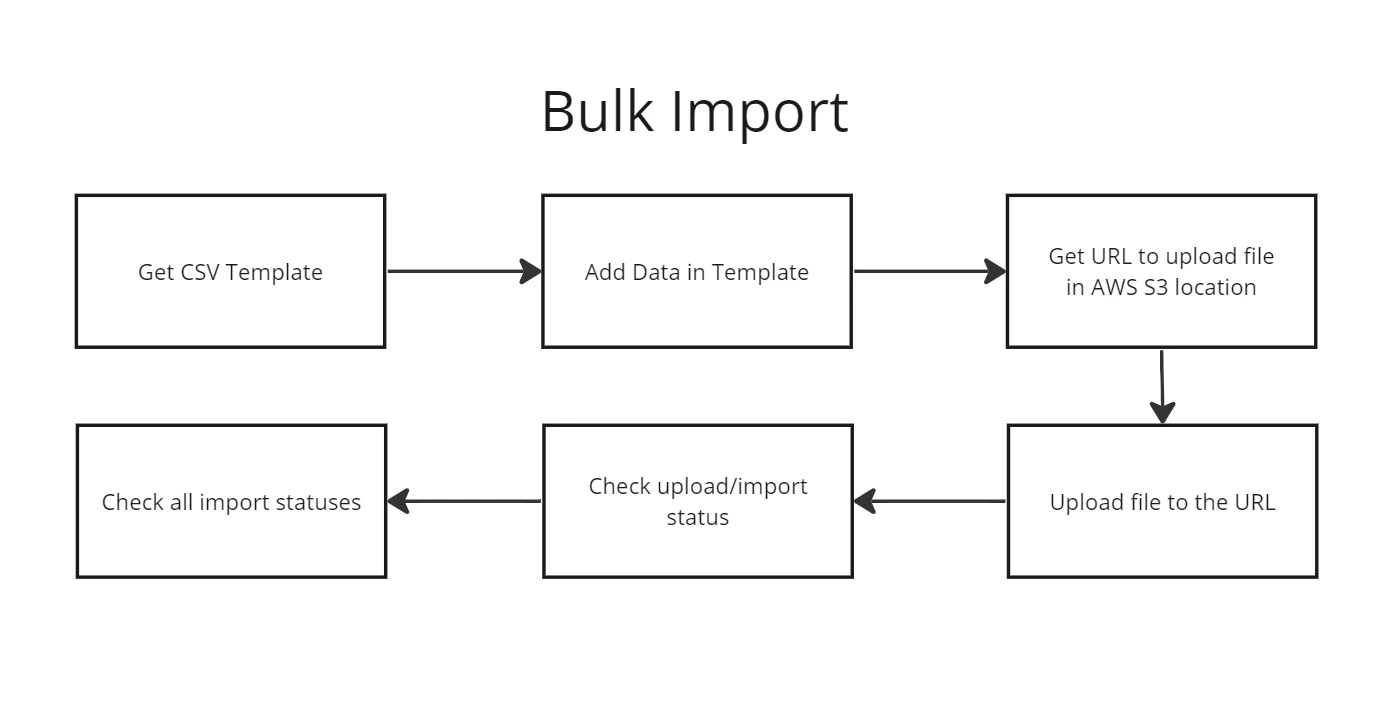
Procedure
- Download the template for the data type you want to import, whether
item,variant,bundle,attribute,category, orcollection. This template contains header columns required for successful data ingestion. Fill out the template locally with your product data.
- Use the create file object and get upload location endpoint to generate an AWS S3 bucket URL for uploading your completed import file. This URL ensures secure, direct file upload to fabric’s storage.
-
Use the pre-signed upload URL returned in step 2 to make a
putrequest and upload your completed CSV file from your local system. - Retrieve previously uploaded or exported files—including error logs—using the get files available for a merchant endpoint.
- Use the get jobs endpoint to monitor the status of previous import or export operations, including completion or failure messages.